Monday, February 27, 2012

DIY Cupcake Liner String Lights

Cupcake Liner Lights have been popping up all over different website and blogs; and I was always impressed by how simple, yet awesome they looked.

The other day, while I was getting things together for my booth at Castroville Market Days next month, I decided that a string of cupcake liner lights would be the perfect addition to my table!

All I needed was a string of Christmas lights (I found a small strand with 10 lights on it) and enough cupcake liners to cover each one.


 To get the liners onto to lights, just gently push the bulb through the bottom of the paper.


 And that's it!


In five minutes, I took a string of lights that was going to collect dust until next Christmas, and transformed it into a really neat light fixture, perfect for any baking (or cupcake) enthusiast's kitchen!


How To: Tye Dye Cupcakes


Tye Dye Cupcakes are probably the coolest cupcakes ever invented... I hate to just throw out a blanket statement like that, mainly because there are so many cupcakes out there that others might consider cooler; but I'm going to have to disagree... because they are not. 
The colorfulness, the fact that no two cupcakes are the same, they are Tye Dye... it's practically a no-brainer!

The only downside to the awesomely delicious treats are that they do take a little time and effort.

How To: Tye Dye Cupcakes

Supplies:

White cake batter (whether homemade or from a box, it's up to you) 
at least 4 different colors of food color
4 bowls
4 spoons
cupcake liners
White frosting (like vanilla butter cream)
colorful sprinkles

Directions:

Start with the white cake batter: I made enough to normally make 2 dozen cupcakes, but after all the dividing and pouring, etc. I had enough batter to make about 15 cupcake, so plan accordingly.


Divide you batter into four, or however many colors you want to do.


Add you food color.


Stir to evenly distribute the coloring.  Make sure you don't sure too much or the batter will get loose, making for denser cupcakes.


Pick a color (I chose red) and spoon it in as your bottom layer.  (I'm sure you can tell that I was having problems with my cupcake liners for some infuriating reason..) Make sure you don't put too much of one color in the liners, or else you will either overfill your cupcake holders or have tiny little top layers. (I had this problem..it's tricky!)


Yellow for the next layer...


Green for the next...


and blue for the final layer. Notice: not much green or blue...


To get that "Tye Dye" effect, take a toothpick or wooden skewer and make a quick swirl motion.  Make sure you don't over do it or the colors with blend together to make a brown sort of color!


Make sure you clean off your toothpick or skewer... I was out of paper towels and I didn't want to get the kitchen towels dirty, so I used the palm of my hand!  I felt like one of the blue people in Avatar or something! (Nerd confession: I know that the blue people from Avatar are called Na'vi...just saying)


This is what the cupcakes look like once they are swirled.


Bake the cupcakes according to whatever recipe you are following for your batter.


And tada!

Tye Dye Cupcakes..

Let cool...then frost, and decorate!

***The picture at the top was from another time my sister and I made Tye Dye cupcakes. I left these un-frosted so that I could freeze them.

Flavored Teas: Lemony Spiked Sweet Tea

Despite the fact that it is currently in the low-60's, rainy and windy; just a few days ago the temperature almost reached 90 and the sun was out and shinning.  It was starting to feel like spring, which in Texas does not get to stick around very long.  Usually we go from winter, to a month of so of spring, and then to about six months of summer.  Needless to say, when spring starts to arrive, everyone looks forward to it.

After the one spring-like day last week, the temperature has gone back to being cold, at least for Texans it cold... but during that one warm day, while I wore a short sleeve shirt (no jacket) and a pair of flats (no socks having to keep my toes warm), I started to daydream about warmer weather.

One of my favorite things about spring and summer are the drinks that people only seem to make when the weather is warm; and being from the South, that drink is usually sweet tea.  While I love sweet tea just as much as the next Texas girl, I thought that the first "spring" day of the year deserved something a little more interesting.

I adapted this recipe from Martha Stewart's 60 Days of Summer.


Lemony Spiked Sweet Iced Tea

Ingredients

7 cups water
6 orange and spice tea bags
1 1/2 cups sugar
1 1/3 cups lemon juice
1 cup Bacardi rum
Fresh mint sprigs, optional

Directions

Bring 4 cups of the water to a boil in a medium saucepan and add the tea bags. Remove the pan from the heat, cover it, and allow the tea bags to steep for 5 minutes.


Remove and discard the tea bags. Add the sugar to the saucepan and stir until dissolved. Add the remaining 3 cups water and stir to combine.


Transfer the mixture to a pitcher... (make sure you use a funnel and do this over the sink or something, because as you can see, it can make a pretty big mess)


...and add the lemon juice and rum.


In a glass: add ice cubes, a few mint leaves and then pour or ladle the tea over top.


Cheers!  Here's to spring!

**Note: if you are not a fan of orange, you can always substitute other fruity flavors that go good with lemon, such as raspberry or strawberry tea!

DIY Birthday Cupcake Picks & Cake Banner

The upside to the profession I have chosen for my life, (baker, in case you were wondering) is that I get to be creative everyday and make things that are pretty and people can enjoy... the downside is that when you are trying to start your own baking business, things can get pretty expensive.

I have been racking my brain trying to come up with a way to cut down on some costs, without loosing any of the quality of work (and just FYI, I am a perfectionist when it comes to the work I do for other people).

During my search, I have come across numerous websites and examples of people making their own decorations for their cupcakes and cakes; and while I am by no means an expert at crafting, I can pull together a few "crafty" things if I set my mind to it..

To make these Birthday Cupcake Picks and a "Happy Birthday" Cake Banner, I used:

  • Wax Paper
  • Scissors
  • Super Glue
  • Scrap-booking Stickers, I got mine from Wal-Mart
  • Wooden beads, also from Wal-Mart
  • Wooden Skewers
  • Toothpicks
  • String/twine/ribbon, etc. (pictured is black ribbon, but I didn't like how it was working out so I switched to twine)

The whole process is quick and easy and I did 25 picks and 1 banner in about 15 minutes.


For the picks, I just pulled off the sticker cover and glued the toothpick onto it.  Make sure you do this on top of wax paper because the glue might drip and that would be bad... I used super glue because I liked that when it dries you can't see it at all and because it's such a strong glue, I know the designs wont fall off into the cake!  Let the picks dry complete before you try to pick them up, or the glue may drip down the toothpick and that's how you get fingers glued to things...

For the banner, I measured out how much string/twine/etc. I wanted to use and strung "Happy Birthday" in block letters onto it.  Then I knotted the twine and put a dab of glue to hold it in place.  I left it looking sort of plain that way I could add ribbons, etc. to match whatever theme I was making it for.

And the final product...


So now that I know how easy it is to make my own cupcake toppers, I am really excited to try out more designs!  Hopefully you like what you see and are inspired to try your hand at making your own cupcake and cake toppers!

Sunday, February 26, 2012

Easy Chocolate Cake

Everyone loves chocolate!  Everyone.  If someone tells you they don't, they are either lying or clearly mentally unstable; either way you should probably avoid them at all cost.  Below is my interpretation of how a normal person reacts to chocolate...

Picture Source: modenus.com
above: normal

I am obviously joking (mostly), but my point is most people love chocolate and those people also probably love cake.  

Which brings me to one of the easiest and most delicious tasting chocolate cake recipe that I have found so far.  I adapted it from Ina Garten's recipe from FoodNetwork.com.

Easy Chocolate Cake

Ingredients

1 3/4 cups flour
2 cups sugar
3/4 cups cocoa powder
2 tsp baking soda
1 tsp baking powder
1 tsp salt


1 cup buttermilk, shaken
1/2 cup vegetable oil
2 large eggs, at room temp.
1 tsp vanilla extract
1 cup freshly brewed coffee

Baking Spray with flour
Parchment/Wax paper, to line pans


Directions

Preheat the oven to 350 degrees F. 

Spray pans with baking spray, then line with parchment paper and set aside.

 
Sift together dry ingredients into a bowl.


In another bowl, combine the rest of the ingredients except for the coffee. 

 
With the mixer on low speed, slowly add the wet ingredients to the dry. 

 
 With mixer still on low, add the coffee and stir just to combine. 


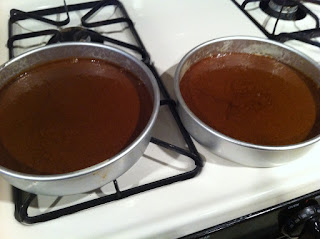
Pour the batter into the pans and bake for 35 to 40 minutes, or until done completely. 


Let rest in the pans for 30 minutes.


Turn them out onto a cooling rack and let cool completely.


And you have yourself a great, easy chocolate cake, perfect for a number of desserts.


One of the reasons why this cake is one of my favorites, is that it is really versatile.  I have frosted it with vanilla frosting, German chocolate frosting, chocolate butter cream frosting and I've used it to make cupcakes!


My most recent use of this chocolate cake was for last month's Super Bowl...


Friday, February 24, 2012

DIY Crafts: Salt Dough

One of my favorite obsessions, and to be honest I have so many it gets hard to keep track, but one of my favorites is Pinterest!  I've had an account with them for a little while now, but so far I had only "Liked" or "Re-pinned" about a million things and had not even attempted any of the numerous DIY crafts that I had spent so many hours looking at! (I would like to add, that I have tried plenty of recipes so far, but no crafts! Just clarifying)

I knew something needed to been done about that immediately and I also knew that I wanted to blog about it.. in came my first Pinterest inspired craft:  Salt Dough Ornaments

It had everything I liked to blog about: baking, food ingredients, cute stuff.. but it was also a fun, easy to do craft!

If you are bored and you like to bake, this is a neat thing to do that doesn't require a lot of skill (thank goodness!)  You just need three ingredients to get started!

Salt Dough Recipe

Ingredients:

2 Cups Flour
1 cup Salt
1 cup water


For the Supplies:

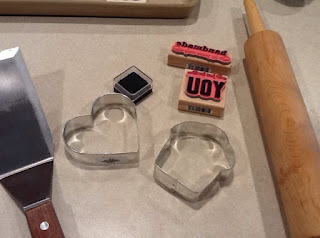
Rolling Pin
Stamps and Ink
Cookie Cutters
Spatula
Sand Paper


Directions:

In a bowl, add the flour...

the salt and the water.

Knead the mixture together until the dough forms.  It will feels grainy and very different from what you are use to!  It is because of the WHOLE cup of salt!


Roll out your dough to about 1/4 in. thickness.


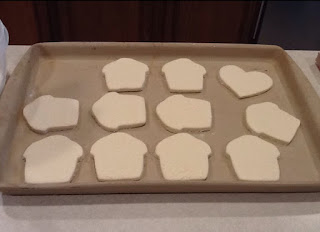
Cut out your design: I choose a cupcake cookie cutter my husband got me for Christmas...


I also cut out a heart.. just because!


Since this was all just experimental anyway, I decided to try stamping a couple of the "ornaments".


The next step was where I had trouble, after I made, rolled and cut out the dough, I read the rest of the directions.  You are suppose to bake the ornaments at 200 degrees for 6 hours.

 
Well, I decided to try and cut that time down, so I baked them for 1 hour at 200 and then cranked the oven up to 400 degrees for another 2 hours or so.

While the ornaments turned out okay, some of them were a little puffed up in the middle, and I think that was because I cooked them too high.


After you take them out of the oven, let them cool.  Take a piece of sandpaper or a sturdy file and file down the rough edges.
 
So, if you plan on wasting away the afternoon doing something crafty, this project doesn't let you down; just make sure you have enough time to do it right!

I still have to paint the little guys (everyone keeps asking me if they are little houses, so I definitely need to paint them to make them look like cupcakes!), but I still have to go into town to get some pretty paint... 

If I get a chance to do it soon, I'll post the pictures, but I also think with a little clear varnish and a pretty ribbon hanger, they could be neat just the way they are...