Showing posts with label Cupcakes. Show all posts

Wednesday, March 14, 2012

St. Patrick's Day 2012: "Irish Car Bomb" Cupcakes


I have been so busy the last few weeks, that this is my first post in awhile.  Recently, I've quit my job, found another job, got ready for my booth at Castroville Market Days (only to have it rained out), and have been packing up all our stuff because this Saturday we are moving into a new loft!  We are extremely excited about this; the only problem is that Saturday also happens to be St. Patrick's Day.  Which brings me to my post. 

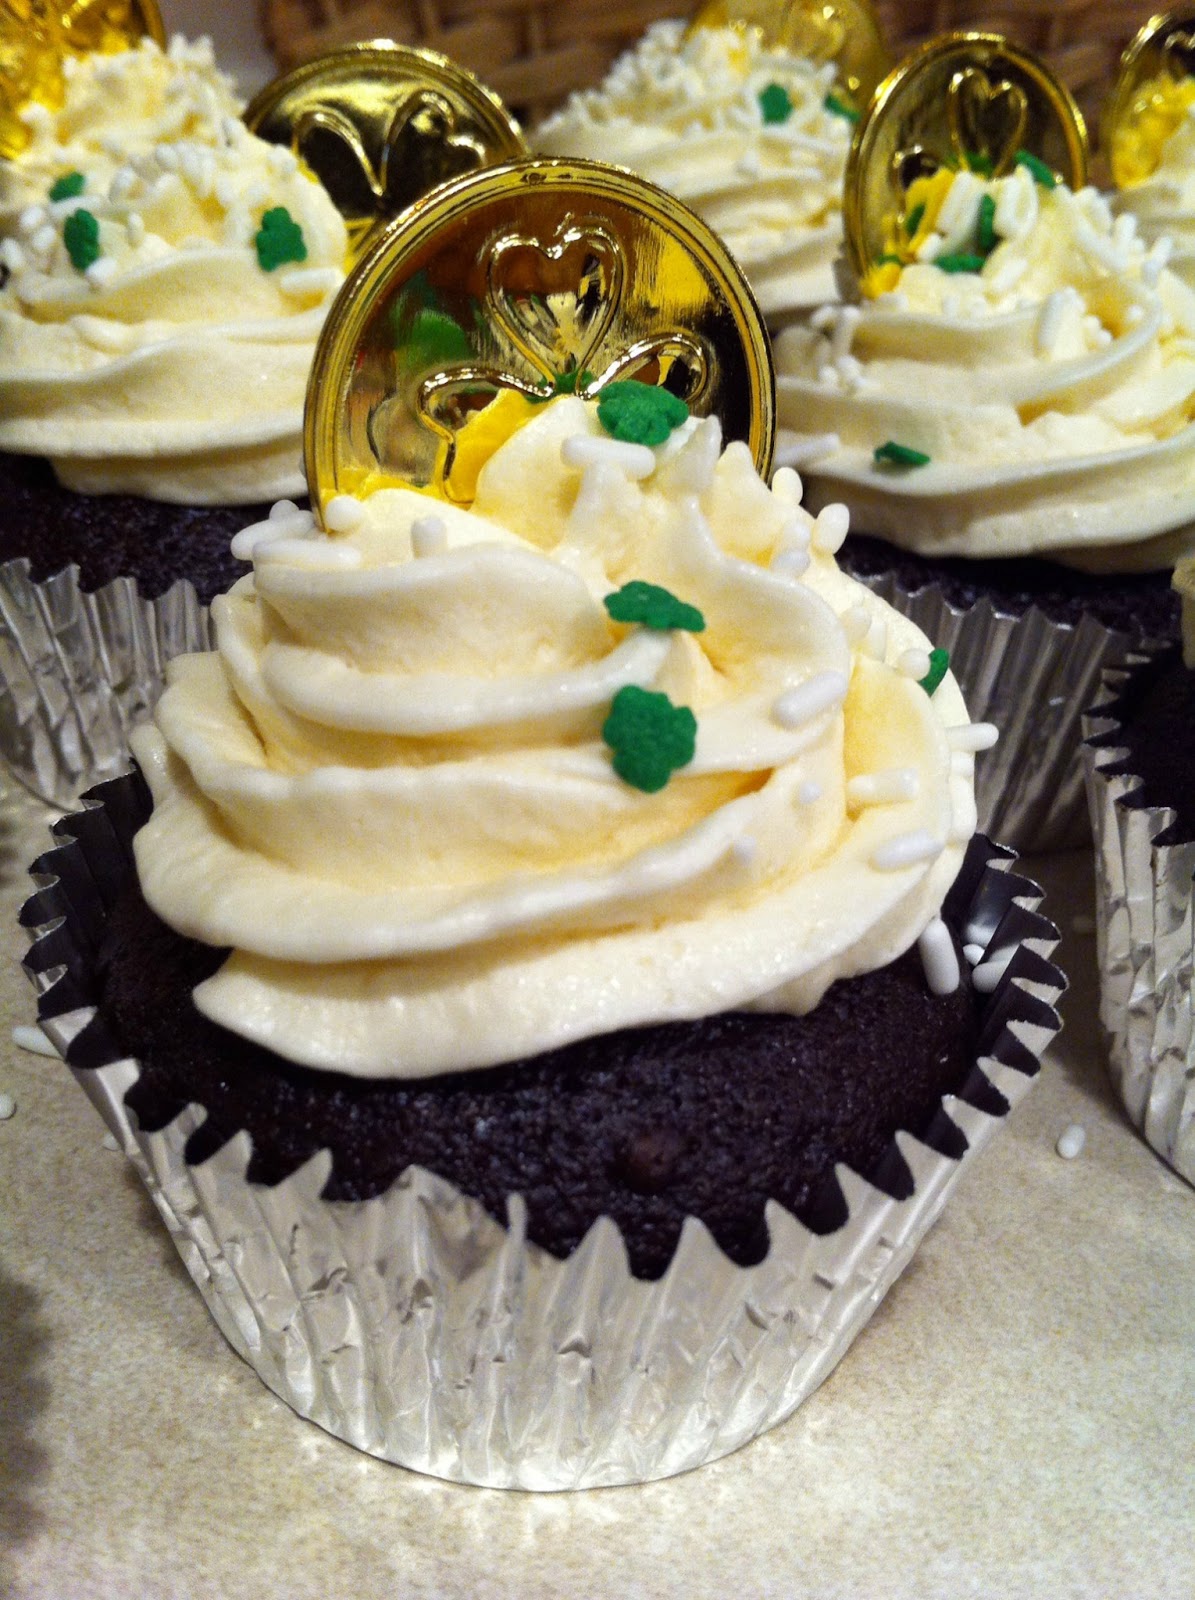
In honor of St. Patty's Day, I made "Irish Car Bomb" Cupcakes.  I've seen these little guys all over Pinterest and other websites and I have wanted to make them for awhile, so I thought what the heck!  Not only do I love the drink for which they are modeled after, but I also really really liked the cupcakes!  While they definitely have an alcohol flavor to them (mostly in the frosting) the rest of the cupcake is well balanced and really delicious.

Irish Car Bomb Cupcakes 
Makes about 2 dozen cupcakes

Ingredients:

For the Cake:
1 cup Guinness stout
1 cup unsalted butter, at room temp
¾ cup cocoa powder
2 cups flour
2 cups sugar
1½ tsp baking soda
¾ tsp salt
2 eggs
2/3 cup sour cream

For the Ganache:
8 ounces semi-sweet chocolate chips
2/3 cup heavy cream
2 tbsp butter, at room temp
2 tsp Irish whiskey

For the Frosting:
2 cups unsalted butter, at room temp
5 cups powdered sugar
6 tbsp Baileys Irish Cream


To Make the Cupcakes:

Set oven to 350.  Line cupcake pans.  In a medium saucepan, bring the Guinness and the butter to a simmer.  Add the cocoa powder and whisk until smooth.  Let cool slightly.


In a large bowl, combine the dry ingredients: flour, sugar, baking soda and salt.  Beat the eggs and sour cream together.  Add the chocolate mixture to the egg mixture and beat until combined.  Add the dry ingredients to the wet ingredients; folding with a spatula to combine completely.


Divide batter among the liners.  Bake until done, about 18 minutes.  Cool completely.


Next make the Ganache Filling:

Pour the chocolate chips into a metal bowl.  Heat the cream in a small saucepan until just simmering and pour over the chips.  Let sit for a minute and the stir until smooth, starting in the center and working your way outward.  Add the butter and whisky; stir until combined.  Let cool until thick enough to be transferred to a piping bag.


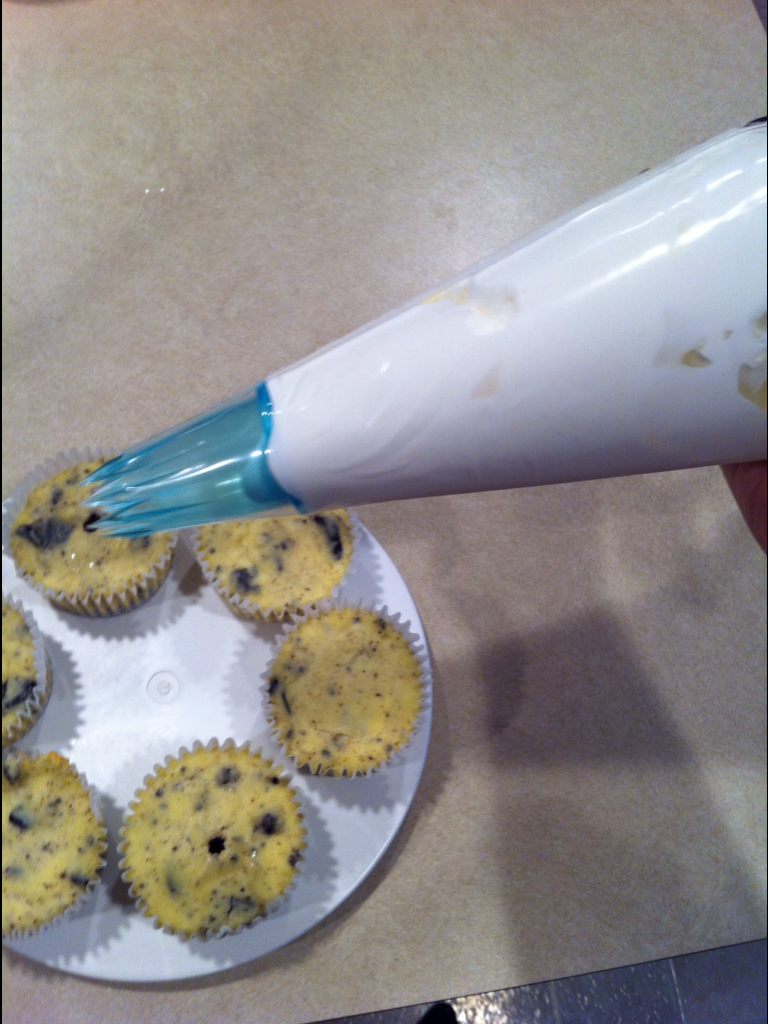
To fill the cupcakes:

Take a large piping tip and insert it into the middle of each cupcake; twist and remove, thus cutting out a small hole.  Take the ganache and fill each cake to the top. Make sure you let the ganache thicken up or else it will spill everywhere!


**If you are going to freeze these; this is the step you would stop on!

Make the Frosting:

Using an electric mixer, whip the butter for about 5 minutes; scraping the bowl occasionally.  Reduce the speed and add the powdered sugar slowly.  Add the Baileys and whip until the frosting is light and fluffy.

Finally:

Decorate however you choose!


**Quick note: If you haven't tried the drink yet (and you are over 21, of course), you should make that a must try this St. Patrick's Day!

Irish Car Bomb (The Drink)

1/2 oz Bailey's Irish Cream
1/2 pint Guinnes Stout
1/2 oz Irish Whiskey

Pour the Guiness (chilled) into a beer mug and let it settle.  Take the whiskey and put it in a shot glass, add the Bailey's on top.  Drop the shot into the beera and chug immediatley.  If you don't drink it quick enough, the drink will start to curddle and it's pretty gross!

Happy St. Patrick's Day!!

Monday, February 27, 2012

How To: Tye Dye Cupcakes


Tye Dye Cupcakes are probably the coolest cupcakes ever invented... I hate to just throw out a blanket statement like that, mainly because there are so many cupcakes out there that others might consider cooler; but I'm going to have to disagree... because they are not. 

The colorfulness, the fact that no two cupcakes are the same, they are Tye Dye... it's practically a no-brainer!

The only downside to the awesomely delicious treats are that they do take a little time and effort.

How To: Tye Dye Cupcakes

Supplies:

White cake batter (whether homemade or from a box, it's up to you) 
at least 4 different colors of food color
4 bowls
4 spoons
cupcake liners
White frosting (like vanilla butter cream)
colorful sprinkles

Directions:

Start with the white cake batter: I made enough to normally make 2 dozen cupcakes, but after all the dividing and pouring, etc. I had enough batter to make about 15 cupcake, so plan accordingly.


Divide you batter into four, or however many colors you want to do.


Add you food color.


Stir to evenly distribute the coloring.  Make sure you don't sure too much or the batter will get loose, making for denser cupcakes.


Pick a color (I chose red) and spoon it in as your bottom layer.  (I'm sure you can tell that I was having problems with my cupcake liners for some infuriating reason..) Make sure you don't put too much of one color in the liners, or else you will either overfill your cupcake holders or have tiny little top layers. (I had this problem..it's tricky!)


Yellow for the next layer...


Green for the next...


and blue for the final layer. Notice: not much green or blue...


To get that "Tye Dye" effect, take a toothpick or wooden skewer and make a quick swirl motion.  Make sure you don't over do it or the colors with blend together to make a brown sort of color!


Make sure you clean off your toothpick or skewer... I was out of paper towels and I didn't want to get the kitchen towels dirty, so I used the palm of my hand!  I felt like one of the blue people in Avatar or something! (Nerd confession: I know that the blue people from Avatar are called Na'vi...just saying)


This is what the cupcakes look like once they are swirled.


Bake the cupcakes according to whatever recipe you are following for your batter.


And tada!

Tye Dye Cupcakes..

Let cool...then frost, and decorate!

***The picture at the top was from another time my sister and I made Tye Dye cupcakes. I left these un-frosted so that I could freeze them.

DIY Birthday Cupcake Picks & Cake Banner

The upside to the profession I have chosen for my life, (baker, in case you were wondering) is that I get to be creative everyday and make things that are pretty and people can enjoy... the downside is that when you are trying to start your own baking business, things can get pretty expensive.

I have been racking my brain trying to come up with a way to cut down on some costs, without loosing any of the quality of work (and just FYI, I am a perfectionist when it comes to the work I do for other people).

During my search, I have come across numerous websites and examples of people making their own decorations for their cupcakes and cakes; and while I am by no means an expert at crafting, I can pull together a few "crafty" things if I set my mind to it..

To make these Birthday Cupcake Picks and a "Happy Birthday" Cake Banner, I used:

  • Wax Paper
  • Scissors
  • Super Glue
  • Scrap-booking Stickers, I got mine from Wal-Mart
  • Wooden beads, also from Wal-Mart
  • Wooden Skewers
  • Toothpicks
  • String/twine/ribbon, etc. (pictured is black ribbon, but I didn't like how it was working out so I switched to twine)

The whole process is quick and easy and I did 25 picks and 1 banner in about 15 minutes.


For the picks, I just pulled off the sticker cover and glued the toothpick onto it.  Make sure you do this on top of wax paper because the glue might drip and that would be bad... I used super glue because I liked that when it dries you can't see it at all and because it's such a strong glue, I know the designs wont fall off into the cake!  Let the picks dry complete before you try to pick them up, or the glue may drip down the toothpick and that's how you get fingers glued to things...

For the banner, I measured out how much string/twine/etc. I wanted to use and strung "Happy Birthday" in block letters onto it.  Then I knotted the twine and put a dab of glue to hold it in place.  I left it looking sort of plain that way I could add ribbons, etc. to match whatever theme I was making it for.

And the final product...


So now that I know how easy it is to make my own cupcake toppers, I am really excited to try out more designs!  Hopefully you like what you see and are inspired to try your hand at making your own cupcake and cake toppers!

Thursday, February 23, 2012

Happy 100th Birthday, Oreo! (and 22nd to my brother)

On March 6th of this year, milk’s (and my own) favorite cookie, Nabisco’s Oreo, will be turning 100!

In celebration of the milestone, Nabisco has released a limited edition flavor called “Birthday Cake” and I’m really excited about this, because I really do love Oreos, but I mean, who doesn’t?!


While I unfortunately haven’t had a chance to try them yet (I haven’t even seen them in stores where I live), so far the feedback (of the lucky ones whose stores are actually carrying them) seems to be positive.

Until I get a chance to try them for myself however, I will just have to make do with the original... life is so hard sometimes.

Below is what I decided to make to celebrate both the Oreo’s birthday and my little (well younger, he’s been quite a bit taller than me for some time now) brother’s 22nd birthday.

I decided on the mini Oreo cheesecakes for two reasons.  One, the whole two birds with one stone thing, meaning, I got something to blog about, while eating Oreos and made something for my brother’s birthday (so I guess that’s three birds..), and two he loves all things sweet, chocolate and cheesecake-y.

Mini Oreo Cheesecakes
adapted from the recipe @kraftrecipes.com


32 Oreo cookies, divided
3 pkg. of 8oz cream cheese (I like Philadelphia)
¾ cup sugar
¾ cup of sour cream
1 tsp vanilla (wish my homemade extract was ready!)
3 eggs
Whipped cream topping (make it yourself if you have time)

Directions

Heat oven to 350

Place 1 cookie in each of the cupcake holders

Chop the remaining 8 cookies and set aside

Beat cream cheese and sugar until blended

Add sour cream and vanilla until mixed well


Add eggs, 1 at a time

Stir in chopped cookies


Scoop into baking cups

Bake 18 to 20 mins

Cool completely and refrigerate until chilled, about 3 hours

Top with whipped cream.


Makes 24 mini cheesecakes

***Kraft Kitchen Tips:

If you are going to make ahead: Cheesecakes can be stored in refrigerator up to 3 days, or frozen up to 1 month, before topping with COOL WHIP and cookie half just before serving. If freezing cheesecakes, thaw overnight in refrigerator before garnishing.


Happy Birthday Oreo!
and to Stephen too!

Thursday, February 16, 2012

Valentine's Day

For some people, Valentine's Day can be a painful day if they are single or are away from their significant others.  Then you have those who prefer to hate Valentine's Day and instead of just ignoring it, make it their goal to ruin it for everyone else.  If either is the case for you, you should probably stop ready this post right now....

For those of you who like Valentine's Day or are couldn't care either way, by all means, keep reading...

Last year, my husband was still stationed in Virginia and it was a little hard being away from him, especially since we had spent the previous six Valentine's Days together; but this year, he woke me up with a glass of sparkling grape juice (he said he had wanted to get wine, but decided against it, after all it was 9 o'clock in the morning), a long-stemmed rose, a box of chocolate, a card, a chick flick that I love (and he can't stand.. that's true love) and then when I went out to the front porch, a pot of tulips (my favorite flower) were sitting there waiting for me.


He deserves gifts also, so I got him five days of playing video games without my complaining (a great sacrifice on my part just so you know), chocolates, sunflower seeds (there are like cigarettes to him) and mini bottles of Jack Daniels (I thought he might like that more than flowers).

For our Valentine's date, we went to eat at Tokyo Steak House in San Antonio; it's this great Japanese cooking table restaurant that is in a terrible location.  The part of town isn't a bad one, but the restaurant is part of a huge building that houses at least one other place, and that is all hidden behind other shops.

Since we went sort of early, we were one of the only parties there and that meant we had the whole table and chef to ourselves.  While that made for less awkward small talk with strangers, it also meant more awkward
small talk with the chef (usually we prefer to appreciate the cooking process in silence, while the other people talk).


The salad was good, but different from the last time we had eaten there.  We like the dressing to have more ginger than it did this time.  The soup was also good, but different and the fried onion they put in it was almost too much.

The main meal was so good that I didn't even have to add soy sauce and if you know me at all, I add always add soy sauce.  But this time, the food was so flavorful I just didn't want to ruin it.  I also got a virgin strawberry daiquiri because the one with alcohol was too expensive and I'm cheap..  It was really good and sweet, with a sugar rim that make the whole thing taste like a strawberry pie!


We were so full halfway through it that we took plenty of leftovers to go..The meal was great, but at the same time, it also made us miss this place that we use to go to in Virginia.  It was called Sakura, and if Tokyo Steak was a cheeseburger, Sakura would be a filet mignon!

Afterwards, we went to see a sneak preview (out just for Valentine's Day) of the new movie, "This Means War", that comes out on Friday.  That movie is hilarious and it doesn't hurt that starring in it are two very pleasing-to-the-eye guys who like to kick butt!


Also in the spirit of Valentine's Day, my mom made these cute cupcakes 


and I made some Valentine's Day Marshmallows (which I will be posting about very soon!)


All in all, I had a great Valentine's Day, as I hope everyone else DID as well!..and if you didn't, remember, you have a whole year until the next one!

Happy Valentine's Day everyone!!